Creating a Compost Bin
Materials Needed
Gather the following materials for your compost bin project.
- Wooden pallets or chicken wire
- Nails or screws
- Wire cutters
- A hammer or screwdriver
- Scissors for cutting materials
- Compostable materials (food scraps, lawn clippings, leaves)
Step-by-Step Instructions
Start by selecting an appropriate location for your compost bin.
Choose a spot that is dry, shady, and easily accessible.
You will need space for turning the compost regularly.
Next, create a frame using wooden pallets or chicken wire.
If using pallets, secure them together with nails or screws.
Alternatively, use chicken wire to form a circle for a compact design.
After that, ensure there is proper ventilation in your compost bin.
Make sure the sides are not completely sealed to allow airflow.
Now, begin adding your compostable materials to the bin.
Mix green materials like food scraps with brown materials like dried leaves.
Layer the materials as you add them to ensure even decomposition.
Regularly turn the compost to promote aeration.
This action speeds up the decomposition process.
Finally, monitor the moisture content of your compost.
Transform Your Agribusiness
Unlock your farm's potential with expert advice tailored to your needs. Get actionable steps that drive real results.
Get StartedIt should be damp but not soggy, similar to a wrung-out sponge.
After several weeks, your compost will be ready to use in your garden.
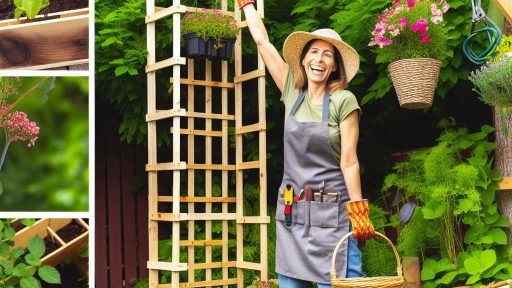
Building Raised Garden Beds to Improve Soil Drainage and Fertility
Benefits of Raised Garden Beds
Raised garden beds enhance soil drainage significantly.
They improve soil fertility by allowing better access to nutrients.
This method promotes root development, ensuring healthier plants.
Additionally, raised beds reduce soil compaction from foot traffic.
Choosing the Right Location
Select a sunny spot for optimal plant growth.
Avoid areas with standing water to prevent root rot.
Ensure easy access for watering and harvesting.
Consider proximity to your home for convenience.
Gathering Materials
Use untreated wood for building the frames.
Cedar or redwood works well due to natural rot resistance.
Gather tools such as a saw, drill, and screws.
Gather soil amendments like compost and peat moss.
Building Your Raised Garden Bed
Start by cutting your wood to the desired dimensions.
Assemble the frame in a rectangular shape.
Secure the corners with screws for stability.
Place the frame on the chosen location in your yard.
Filling the Raised Bed
Layer materials for optimal soil health.
Fill the bottom with coarse materials like stones or branches.
Add a layer of compost for nutrients next.
Top with high-quality garden soil to support plant growth.
Maintaining Your Raised Garden Bed
Water regularly to keep the soil moist.
Add mulch to reduce weeds and retain moisture.
Showcase Your Farming Business
Publish your professional farming services profile on our blog for a one-time fee of $200 and reach a dedicated audience of farmers and agribusiness owners.
Publish Your ProfileMonitor for pests and diseases to ensure plant health.
Rotate crops each season to rejuvenate the soil.
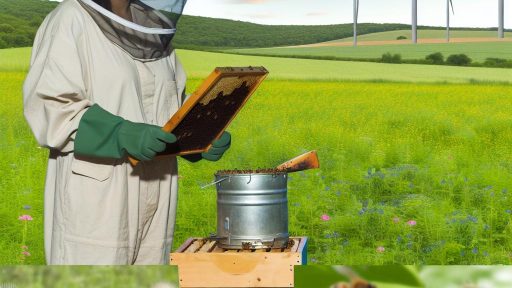
Implementing a Soil Testing Routine
Importance of Soil Testing
Soil testing is crucial for effective farming.
It helps identify the nutrient levels in your soil.
Understanding these levels informs your fertilizer choices.
Ultimately, it enhances crop production and soil health.
Collecting Samples
Begin by identifying your testing area.
Choose a representative location that reflects your field.
Use a clean soil probe or spade for sample collection.
Take samples from multiple spots to ensure accuracy.
Avoid areas disturbed by animals or machinery.
Mix samples in a clean container for uniformity.
Label them clearly for easy identification later.
Sending Samples for Analysis
Once collected, prepare your samples for testing.
Remove any debris such as rocks or plant matter.
Follow the guidelines provided by your testing service.
Send your samples to a reputable laboratory.
Consider local agricultural extension services for assistance.
Interpreting Results
Receiving your soil test results is exciting.
Each report typically provides nutrient levels and pH.
Check for recommendations based on your crops.
Look for indicators of soil health, such as organic matter levels.
This information helps you make informed decisions.
Adjusting Soil Management Practices
After reviewing your results, adapt your practices accordingly.
Incorporate organic matter to improve soil health.
Consider applying fertilizers based on nutrient needs.
Regularly testing soil can optimize your farming strategies.
This proactive approach leads to sustainable farming outcomes.
See Related Content: Small Livestock Management for Profitable Small-Scale Farming
Cover Crops: Selecting and Planting to Enhance Soil Structure
Importance of Cover Crops
Cover crops play a crucial role in improving soil health.
They prevent erosion and minimize nutrient runoff.
Additionally, cover crops enhance soil structure over time.
Choosing the Right Cover Crops
Select cover crops based on your specific soil needs.
Consider factors such as climate, soil type, and crop rotation.
Legumes, for example, add nitrogen to the soil.
Grasses help with root structure and moisture retention.
Recommended Cover Crops
- Clover – nitrogen-fixing and suitable for cool seasons.
- Rye – excellent for soil structure and winter hardiness.
- Vetch – enhances nitrogen and organic matter levels.
- Mustard – interrupts pest cycles and adds organic matter.
Planting Techniques
Plant cover crops at the right time for maximum benefit.
Early fall is often an ideal time for many varieties.
Ensure proper seedbed preparation before planting.
Use a seed drill for even distribution and coverage.
Showcase Your Farming Business
Publish your professional farming services profile on our blog for a one-time fee of $200 and reach a dedicated audience of farmers and agribusiness owners.
Publish Your ProfileMaintaining Your Cover Crops
Monitor the growth of your cover crops regularly.
If necessary, adjust watering and fertilization to ensure health.
Once mature, incorporate them into the soil before they flower.
Benefits of Using Cover Crops
Incorporating cover crops provides numerous benefits.
They improve soil fertility and promote earthworm activity.
Ultimately, cover crops lead to healthier and more productive soils.
Discover More: Essential Tools for Successful Mushroom Cultivation
DIY Mulching Techniques
Benefits of Mulching
Mulching improves soil health and fertility.
It helps retain moisture and reduce evaporation.
Furthermore, mulching suppresses weed growth effectively.
Additionally, it regulates soil temperature.
Organic mulch adds nutrients as it decomposes.
Types of Mulch
Various materials work well as mulch.
Grass clippings provide nitrogen and decompose quickly.
Bark chips last longer and offer aesthetic appeal.
Straw acts as effective mulch, particularly for vegetables.
Wood chips improve soil quality as they break down.
How to Apply Mulch
First, prepare the garden bed by removing weeds.
Next, level the soil evenly for best results.
Spread a layer of mulch around three inches thick.
Avoid piling mulch against plant stems to prevent rot.
Regularly check and replenish mulch as needed.
Timing for Mulching
Fall is an excellent time to apply mulch for winter protection.
Applying mulch in early spring retains moisture for new growth.
Monitor your garden throughout the seasons for optimal results.
Customizing your timings can optimize soil health.
Additional Tips
Consider using local resources for mulch materials.
Compost can enhance the nutritional value of your mulch.
Experiment with different materials to see what works best.
Always keep mulch away from growing plants to avoid damage.
Gain More Insights: Choosing the Best Substrate for Mushroom Growth

Constructing a Rain Garden: Managing Stormwater for Healthier Soil
Understanding the Importance of Rain Gardens
Rain gardens play a critical role in stormwater management.
They help reduce flooding by absorbing excess rainwater.
Moreover, rain gardens filter pollutants from runoff.
This process promotes healthier soil and ecosystems.
Additionally, they enhance local biodiversity by providing habitats.
Choosing the Right Location
Selecting an appropriate site is essential for a successful rain garden.
Avoid placing it too close to foundations and driveways.
Look for areas where water naturally collects in your yard.
Consider the garden’s exposure to sunlight for plant growth.
Showcase Your Farming Business
Publish your professional farming services profile on our blog for a one-time fee of $200 and reach a dedicated audience of farmers and agribusiness owners.
Publish Your ProfileAccess to water sources for maintenance is also important.
Designing Your Rain Garden
A well-planned design maximizes the effectiveness of your rain garden.
Start by determining the size based on your drainage area.
Use native plants that can thrive in your climate.
Group plants with similar water needs together.
Incorporating different plant heights adds visual interest.
Finally, consider adding landscaping features for aesthetics.
Preparing the Site
Begin by marking the outline of your rain garden.
Next, remove any sod or existing vegetation within the area.
Ensure proper grading to facilitate water flow towards the center.
Installing a perforated pipe can assist with drainage if necessary.
It’s important to amend the soil to improve absorption.
Planting Your Rain Garden
Choose a planting time that aligns with local seasonal patterns.
Begin with large plants at the back and smaller ones in front.
This arrangement creates a natural tiered effect.
Water newly planted flora regularly to promote establishment.
Mulching around plants helps retain moisture and suppress weeds.
Maintenance and Care
Regular maintenance is key to a thriving rain garden.
Monitor for weed growth and remove them promptly.
Check soil moisture and water during dry spells.
Annual evaluations ensure plants are healthy and thriving.
Consider replenishing mulch as needed to maintain effectiveness.
Additional Benefits of Rain Gardens
Rain gardens contribute to the overall health of the environment.
They decrease water runoff and recharge groundwater supplies.
These gardens also play an aesthetic role in landscaping.
They create spaces that enhance outdoor enjoyment and relaxation.
Ultimately, rain gardens represent a proactive approach to sustainable gardening.
See Related Content: Lighting Solutions For Indoor Urban Gardens
Installing Drip Irrigation: A Guide to Efficient Watering Practices
Understanding Drip Irrigation
Drip irrigation delivers water directly to the plant roots.
This method significantly reduces water waste.
Moreover, it promotes healthier plant growth.
Benefits of Drip Irrigation
Drip irrigation conserves water effectively.
This system provides consistent moisture levels.
Additionally, it minimizes weed growth.
As a result, it reduces the need for herbicides.
Choosing the Right Materials
Select high-quality drip tubing and emitters.
Ensure that the materials are UV-resistant.
Also, consider the size of your garden area.
Planning the Layout
Start by mapping out your garden space.
Identify the types of plants you are growing.
Showcase Your Farming Business
Publish your professional farming services profile on our blog for a one-time fee of $200 and reach a dedicated audience of farmers and agribusiness owners.
Publish Your ProfileGroup plants with similar water needs together.
Installing the Drip System
Begin by laying out the main water line.
Attach the emitter tubing to the main line.
Place emitters near the root zones of each plant.
Secure the connections to prevent leaks.
Setting Up a Timer
Install a timer to automate watering schedules.
This ensures plants receive consistent hydration.
Program the timer based on seasonal needs.
Testing and Maintenance
After installation, run the system to check for leaks.
Observe if all emitters provide adequate water.
Regularly clean filters and emitters to prevent clogs.
Adjusting for Weather Conditions
Monitor the weather for changes in watering needs.
Adjust the timer accordingly during rainy seasons.
Be prepared to increase watering during hot months.
Creating a Worm Bin
The Benefits of Vermicomposting for Soil Health
Vermicomposting is an effective way to enhance soil health.
This method utilizes worms to decompose organic material.
The decomposed material enriches the soil with nutrients.
First, create a suitable environment for the worms.
Use a bin that allows for adequate aeration.
Ensure the bin is dark and damp for optimal conditions.
Gather materials such as kitchen scraps and bedding.
- Fruit and vegetable scraps are excellent additions.
- Avoid adding meat or dairy to prevent odors.
- Shredded paper or cardboard can serve as bedding.
Next, introduce worms into the bin.
Red wigglers are the best choice for composting.
They thrive in the conditions found in worm bins.
Feed the worms regularly to maintain a healthy population.
Monitor the bin to prevent overfeeding.
As the worms digest the organic material, they produce castings.
Worm castings significantly improve soil quality.
They enhance water retention and boost microbial activity.
Using vermicompost also reduces the need for chemical fertilizers.
Incorporating this method into your farming practices is beneficial.
Setting Up Your Worm Bin
Start by selecting the right size for your worm bin.
A bin of 10 gallons can hold a good number of worms.
Next, drill holes in the lid and bottom for ventilation.
Your bin needs proper drainage to avoid excess moisture.
After preparing the bin, add bedding materials first.
- Moisten the bedding before adding worms.
- Fill the bin with about 4 to 6 inches of bedding.
Once it’s ready, introduce your worms thoughtfully.
Spread them out evenly across the bedding material.
Continue to monitor moisture levels regularly.
Keep the bin covered to maintain a stable temperature.
Showcase Your Farming Business
Publish your professional farming services profile on our blog for a one-time fee of $200 and reach a dedicated audience of farmers and agribusiness owners.
Publish Your ProfileCheck the moisture by feeling the bedding; it should be damp but not dripping wet.
Harvesting the Vermicompost
Once the worms have processed the food scraps, it’s time to harvest.
This usually takes about 3 to 6 months.
To harvest, move the contents to one side of the bin.
Add fresh bedding and food scraps to the empty side.
Worms will migrate to the new food source.
After a few weeks, the other side will be rich in vermicompost.
Carefully collect the vermicompost from the original side.
Use the nutrient-rich castings to amend your garden soil.
Your plants will thrive from this organic fertilizer.
Additional Resources
How To Make Effective Microorganisms – Step By Step
How to Integrate Regenerative Gardening Techniques in a Garden